Sketchup pro 2021 21.0.339 repack на русском
Содержание:
- Аналоги Google SketchUp
- Создание первой 3D-модели в SketchUp
- Understanding how SketchUp for Web features work differently from the desktop version of SketchUp
- Managing trust and signatures
- Удаление SketchUp
- Viewing scenes in models imported from the 3D Warehouse
- Opening files and recent files
- Sequencing scene tabs
- Plugin: Sketchup Custom Toolbars
- Plugin: Little Sketchup Plugin for Removing Your Inner Face
- Установка SketchUp в первый раз или установка новой основной версии
- Пропорциональное масштабирование выборки
- SketchUp Plugins:
- 1.Joint Push/Pull
- 2.Multiple Offsets
- 3.CLF Shape Bender
- 4.RandomPushPull
- 5.FredoScale
- 6.Soap Skin & Bubble
- 7.Curviloft
- 8.Selection Toys
- 9.Weld
- 10.Fredo6: Bezier Spline
- 12.LSS Matrix
- 13.QuadFace Tools
- 14.Sketchy FFD
- 16.SectionCutFace
- 18.CleanUp³
- 19.Purge All
- 20.Fredo Tools
- 21.Simplify Contours Tool
- 22.Edge Tools²
- 23.Architect Tools
- Uninstalling or removing extensions
- Setting preferences to customize your workspace
Аналоги Google SketchUp
SketchUp считается простым редактором для работы с 3D и 2D моделями. Его функционала вполне достаточно для выполнения самых необходимых действий. Поэтому он подходит не только для любительского, но и профессионального редактирования.
Как и у любой другой программу, у SketchUp есть свои аналоги, к которым относятся такие приложения, как:
- Blender
- AutoCAD
- ArchiCAD
- K-3D
- Art of Illusion
- Zmodeler
Каждый из них имеет свои особенности и недостатки, поэтому подходит для создания предметов интерьера, моделирования игровых персонажей и их последующего внедрения или других целей. Все они имеют схожий между собой функционал и могут частично или полноценно заменить друг друга.
В отличие от них, SketchUp Pro поставляется сразу с дополнительными компонентами Style Builder и LayOut, которые позволяют осуществлять более реалистичную визуализацию созданных моделей, проектов, а также позволяют работать с документацией (чертежи).
Плагины для Google SketchUp Программа проектирования имеет много встроенных компонентов, к примеру, в ней есть библиотека, в которой имеется мебель, текстура материалов и многое другое. Но имеются и независимо компилируемые программные модули, которые динамическим образом подключаются к главной программе и предназначены для того, чтобы расширить ее возможности либо плагины.
Эти уроки очень полезны для тех, кто хочет создать у себя на дачном участке красивый дизайн или можно спроектировать интерьер дома. Рассмотрим основные плагины для программы Google SketchUp pro: V-Ray дает возможность демонстрировать 3d элементы модели; Make Faces может облегчить работу с чертежом и схемой, которые можно импортировать из AutoCAD; Pen Tool+ осуществляет работу в качестве дополнения к инструментам Перо и так далее.
Имеются также плагины, помогающие демонстрировать 3d модели, увеличивают некоторые инструменты, ими можно усовершенствовать анимации, экспортировать в определенный формат некоторые проекты. Плагины можно скачивать и free – свободно. Как применять какой-то из плагинов, можно взглянуть в онлайн-уроки.
Создание первой 3D-модели в SketchUp
Если вы никогда не создавали 3D-модель в SketchUp (или в любой другой программе моделирования), следующие шаги содержат краткий обзор основ:
Выберите человека, щелкните выборку правой кнопкой мыши и выберите Стереть в появившемся контекстном меню.
На панели инструментов «Приступая к работе» выберите инструмент Прямоугольник ().
На плоскости земли в пространстве между красной и зеленой осью щелкните курсор инструмента Прямоугольник (). Затем переместите курсор вправо и щелкните еще раз. На земле появится прямоугольник, как показано здесь.
На панели инструментов «Приступая к работе» выберите инструмент Вдавить/Вытянуть () и поместите его курсор на только что созданный прямоугольник, как показано на следующем рисунке.
Щелкните и перетащите прямоугольник на 3D-форму. Следите за окном «Измерения» и отпустите курсор, когда ваша фигура станет примерно 5 футов высотой.
Ничего не нажимая и не выбирая, введите 6′ и нажмите Enter
Обратите внимание, как высота вашей фигуры изменилась до 6 футов, а введенное вами значение появилось в поле «Измерения».
На панели инструментов «Приступая к работе» выберите инструмент Орбита (). Поместите курсор инструмента «Орбита» над вашей фигурой
Затем щелкните и удерживайте, перемещая мышь вниз. Обратите внимание на изменение фигуры, как показано на следующем рисунке. Практикуйтесь в перетаскивании с помощью инструмента «Орбита» столько, сколько захотите. Работать с ним довольно забавно!
На панели инструментов «Приступая к работе» нажмите кнопку Степень масштабирования (). Если вы, двигаясь вокруг модели, потеряли ориентир, кнопка «Степень масштабирования» является удобным способом найти себя в пространстве.
Если у вас есть мышь с колесом прокрутки, прокрутите вниз, чтобы немного уменьшить масштаб. Работать в SketchUp намного проще с помощью мыши с колесом прокрутки. Однако, если у вашей мыши нет колеса прокрутки, щелкните инструмент «Масштаб» (), чтобы увеличивать и уменьшать масштаб.
Совет. Независимо от того, какой инструмент выбран, удерживание колеса прокрутки активирует инструмент «Орбита», пока вы не отпустите колесо.
На панели инструментов «Приступая к работе» нажмите инструмент «Заливка» ().
На появившейся панели «Материалы» выберите Цвета в раскрывающемся меню, как показано здесь. Затем выберите цвет из вариантов, которые появляются на вкладке «Выбор».
Чтобы применить выбранный цвет, щелкните одну сторону модели с помощью курсора инструмента «Заливка». При желании поэкспериментируйте с различными опциями в раскрывающемся меню. Например, в раскрывающемся меню выберите «Ландшафтный дизайн», «Ограждение» и «Растительность» и примените к своей модели гальку. В раскрывающемся меню выберите «Плитка» и примените понравившийся узор плитки. Используйте инструмент «Орбита» и применяйте разные материалы к каждой стороне модели, как показано здесь.
Закройте панель «Материалы» и выберите Окно > Стили.
Закройте панель «Материалы» и выберите Окно > Стили в пункте Область по умолчанию .
В раскрывающемся меню выберите Эскизные края, а затем выберите вариант стиля. На следующем рисунке выбрано «По ширине маркера». Обратите внимание, что стиль полностью перекрывает все примененные материалы и цвета. Чтобы отобразить их снова, выберите В модели в раскрывающемся меню, а затем выберите параметр Простой стиль.
Understanding how SketchUp for Web features work differently from the desktop version of SketchUp
Right now, here are a few key differences between the way SketchUp for Web and the desktop version of SketchUp work:
- Styles: SketchUp for Web includes many preset styles. However, you cannot edit styles or create your own style templates, as you can in SketchUp for Windows or Mac OS X.
- Materials: SketchUp for Web also includes many preset materials, but you can’t edit or create new materials.
- Keyboard shortcuts: SketchUp for Web shares functionality with your web browser. When familiar SketchUp keyboard shortcuts are in direct conflict with your browser, those shortcuts can’t be used. Don’t worry! We’re working on a way to customize shortcuts within SketchUp for Web. Keep your eyes open for changes.
- Extensions: Extensions are Ruby scripts that add functionality to SketchUp. In SketchUp for Web, extensions currently aren’t available. Because dynamic components also rely on Ruby, this feature isn’t currently available in SketchUp for Web either.
- High-resolution printing: You can print files or download your file in format, but you cannot yet print high-resolution images to scale via SketchUp for Web.
Almost everything about SketchUp is built into the SketchUp for Web. If your favorite feature isn’t there yet, please let us know via the SketchUp for Web (formerly my.SketchUp) user forum.
Note: LayOut and Style Builder, two separate applications that come with a SketchUp Pro license, are not on the SketchUp for Web development schedule.
- shortcuts
- shortcut
- keyboard shortcuts
- keyboard
Managing trust and signatures
Starting with SketchUp 2016, registered extension developers can claim their software by signing it digitally. This signature says, “I made this,” but in a secure coded format. In other words, when an extension is signed, the extension file contains a signature file that is securely tied to the developer’s Extension Warehouse account. An extension may be unsigned if you installed it manually.
Tip: Download the most recent version of any extension you use from the Extension Warehouse, the author, or the original trusted download source. You might contact the author of any extensions that are not digitally signed and ask them to look into this new feature.
The Extension Manager enables you to see whether an extension is signed. If you have an unsigned extension, you can tell SketchUp whether you trust the file, which determines whether the extension can be enabled at startup. Follow these steps:
- Select Extensions > Extension Manager. The Extension Manager window appears.
- In the Extension Name column, you see whether an extension is signed. Click the right-pointing arrow to see an extension’s details, and you can view the extension’s signature information and designate an unsigned signature as trusted.
Удаление SketchUp
При полном удалении SketchUp со своего компьютера необходимо сначала удалить лицензии. Откройте SketchUp, щелкните вкладку Лицензия в окне приветствия, а затем щелкните красную кнопку Удалить лицензию.
Windows
Windows Vista/Windows 7. Щелкните меню Пуск (логотип Windows) > Панель управления > Программы > Программы и компоненты > SketchUp #.
Для удаления SketchUp щелкните Удалить (Удалить в Vista или Windows 7). Когда появится запрос на удаление SketchUp, щелкните Да.
Если у вас возникли проблемы со SketchUp, попробуйте параметр Изменить, после чего начнется процесс переустановки компонентов программы, установленных во время последней установки. Она может исправить поврежденные файлы приложения (эта процедура не изменит и не исправит SKP-файлы чертежей SketchUp). Если это не помогло, попробуйте удалить и переустановить SketchUp.
Mac OS X
- Закройте SketchUp. (Если у вас открыто несколько копий SketchUp, убедитесь, чтобы все они были закрыты).
- Откройте окно Finder.
- Удалите папку SketchUp из главной библиотеки:
- Щелкните Macintosh HD в левой области окна Finder.
- В правой области щелкните Библиотека, а затем Поддержка приложений.
- Найдите папку Google SketchUp # в папке Поддержка приложений и перетащите ее в корзину.
У папки SketchUp 2013 будет имя «SketchUp 2013».
- Удалите папку SketchUp из своей библиотеки пользователя:
- Щелкните свое имя пользователя в левой области окна Finder, затем щелкните Библиотека* в правой области.
- *Если вы пользуетесь Mac OS X 10.7 или более свежей версией, нажмите и удерживайте клавишу Option (Alt), щелкните «Перейти» в меню и выберите параметр Библиотека в раскрывающемся списке. Пример показан в видео.
- Откройте папку Поддержка приложений.
- В папке Поддержка приложений найдите папку SketchUp # и перетащите ее в корзину.
- Щелкните свое имя пользователя в левой области окна Finder, затем щелкните Библиотека* в правой области.
- Удаление приложения SketchUp:
- Щелкните Приложения в левой области окна Finder.
- В правой области найдите папку SketchUp # и перетащите ее в корзину.
- Удалите файл plist:
- Щелкните свое имя пользователя в левой области окна Finder.
- В правой области щелкните Библиотека*, а затем Параметры.
- *Если вы пользуетесь Mac OS X 10.7 или более свежей версией, нажмите и удерживайте клавишу Option (Alt), щелкните «Перейти» в меню и выберите параметр Библиотека в раскрывающемся списке. Пример показан в видео.
- В папке «Параметры» перетащите любой из следующих файлов, если они присутствуют, в корзину:
- Очистите корзину.
- Getting Started
- licensing
Viewing scenes in models imported from the 3D Warehouse
If you download a model from the 3D Warehouse into SketchUp, your download is inserted into your model as a component. However, components don’t have scenes.
Tip: To see and access the scenes, you must open the model in a new instance of SketchUp, so it opens as a full model rather than as a component in a model.
To open a 3D Warehouse download as a model, click No when a message asks, “Load this directly into your SketchUp model?” You then see another message that asks, “Do you want to open or save this file?” Click Open and you can see and use any scenes saved with the model.
For details about saving, sharing, or downloading models via the 3D Warehouse, see the 3D Warehouse section of the Help Center.
- Pages Dialog
- Scenes Dialog
- scene
- scenes
- animate
- animation
- animating
Opening files and recent files
When you launch SketchUp for Web, you’ll have the option to open a model from the Home tab (using the Open button or by choosing a recent file), or the Trimble Connect tab. While modeling, you can return to the Home tab or Trimble Connect tab, by clicking the ‘hamburger’ menu icon in the very top left of your screen. You can also choose the ‘Open’ command in the File operations menu ().
Tip: You can also open SKP model in the Home tab.
Recent files
If you choose to open a recent file — a model that you recently opened or saved in SketchUp for Web — simply double-click its listing in the Home tab (or single-click its file name). This is probably the fastest way to resume working on a model saved in Trimble Connect.
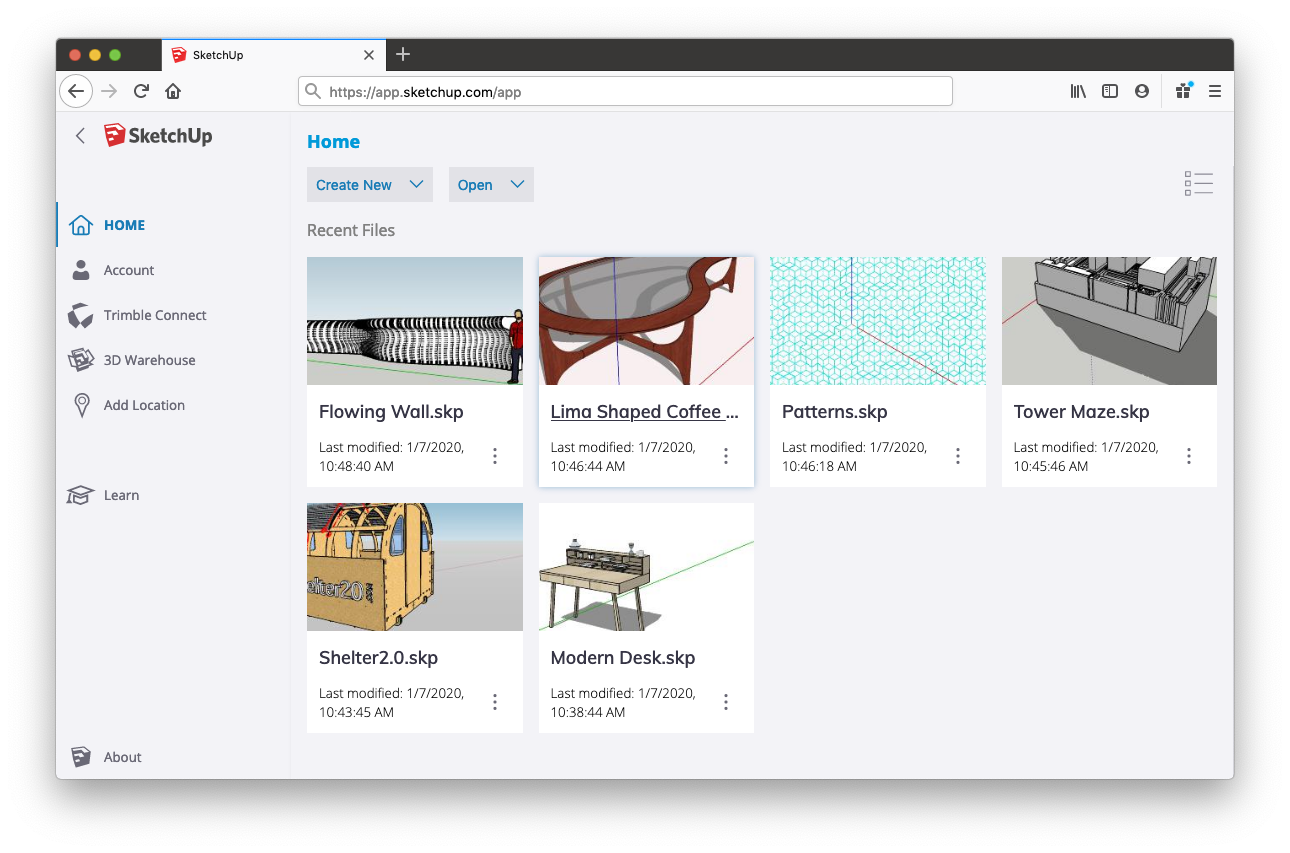
Your list of recent files is actually cached (or stored) in the browser that you SketchUp for Web with. If you clear your browser cache, use another browser, or use another device, you won’t see your recent files. If this happens, don’t worry, just use the Trimble Connect tab to find and open your file.
Open files from Trimble Connect
|
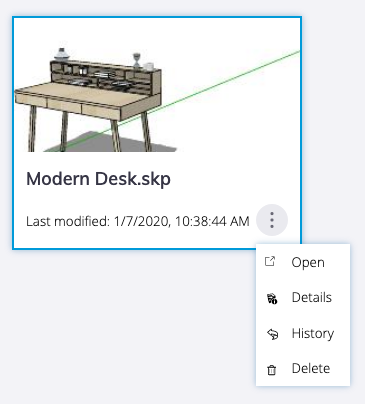
When you choose to Open a file from Trimble Connect, you’ll need to navigate to Project where you saved your file — probably the SketchUp folder if you have a Free subscription — to find your file. When you do, just double-click it’s listing or single-click its name. If you have a lot of files stored in your Project, you may find it useful to change from the default thumbnail view to list view (). In list view, you can sort your file list by name, last modified date, or file size. This can make it a bit easier to find things in a large project. In either list view or thumbnail view, each model has a file options menu. From here, you can choose to open, delete, view file details, or view . These options are also available in the Home tab. |
 |
Sequencing scene tabs
SketchUp adds scene tabs and lists of scenes in the Scenes dialog based on the order in which you create the scenes. However, this order may not be what works best. For example, in the following figure, say you want to move the interior scene later in the sequence, after all the exterior scenes.
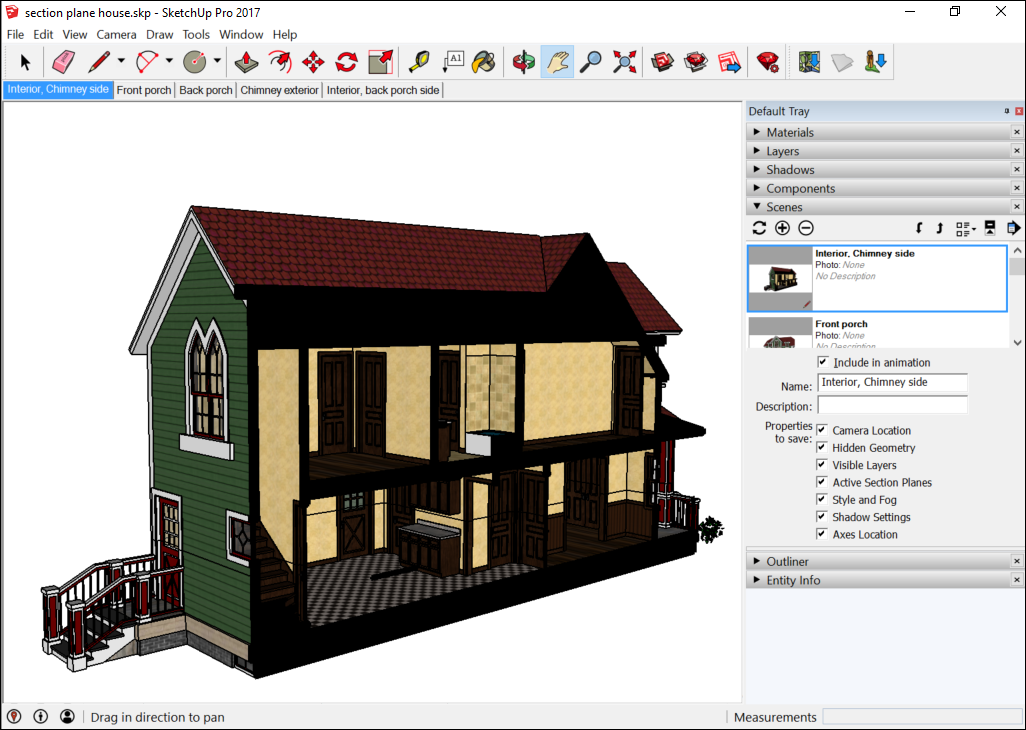
To change the sequence of your scenes, you use either the scene tab’s context menu or the Scenes dialog:
- Scene tab context menu: Context-click the tab you want to move and select Move Left or Move Right. Repeat the command if you want to move the scene more than one position in the tab order.
- Scenes dialog: Select the scene from the list and click the Move Scene Down icon () or the Move Scene Up icon () in the upper right. The tab order updates to reflect the order in the Scenes dialog.
Plugin: Sketchup Custom Toolbars
1
08
2008
Jim Foltz, moderator for the Sketchup Community Forums, has released an incredibly useful script called Custom Toolbars. With it you can build your own customized Toolbars from a large, preconfigured list of commands, which should be expanding as Jim finds the time to work on it. Creating a Toolbar is easy; Custom Toolbars creates a “Toolbars” folder in your SketchUp Plugins folder. Create a .txt file in this Toolbars folder and give it the same name as you want the name of the Toolbar. Then, edit the .txt file and simply list the name of the tool you would like to appear in the Toolbar.
The script comes with really cool icons for each of the commands and the installation instructions are really easy to follow. This one is definitely worth the download! Thanks Jim!! 8)
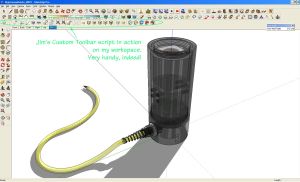
My Sketchup Workspace using Jim’s Custom Toolbar Script
Comments : Tags: 3d architectural rendering, 3d modeling, 3d rendering, 3d rendering software, 3d software, architectural design, architectural led lighting, architectural lighting, architectural lighting design, architectural lighting design tools, Architectural Lighting Industry, architectural visualization, artistic lighting, designing with light, google sketchup, interior lighting, kerkythea, kerkythea rendering system, led architectural lighting, light modeling, lighting artist, lighting design, lighting design software, lighting design tools, lighting designers, lighting engineering, lighting visualization software, Office Lighting, office lighting design, sketchup, Solid-State Architectural Lighting, solid-state lighting design, solid-state office lighting, visualization software
Plugin: Little Sketchup Plugin for Removing Your Inner Face
17
09
2008
Thanks to some handy Ruby scripters (wikii, Matt666, and Pilou) over at Sketchucation (get the plugin there or scroll down to download it here) we have a new Sketchup plugin. It’s called Remove Inner Faces and it does just what it says. You select all of your geometry that you would like to remove inner faces from, and then click on “remove inner faces” from your Plugins menu to remove those faces but leave all of their edges intact.
This image shows an example of inner faces. After you run the script, the outside edges of the selected faces will be intact but the faces will be gone.
Example of inner faces (selected faces) to be removed. Edges will be left intact
Technorati Tags: , , , , , , ,
Comments : Tags: 3d design, 3d plugin, 3d rendering, free plugin, free sketchup plugin, sketchup, sketchup addon, sketchup plugin
Установка SketchUp в первый раз или установка новой основной версии
После загрузки файла выполните следующие действия для установки SketchUp:
- Войдите в систему с помощью учетная записи с правами администратора.
- Дважды щелкните на установочный файл EXE. Можно также вызвать контекстное меню и выбрать Запустить от имени администратора.
- Щелкните Далее в диалоговом окне приветствия.
- Если вы согласны с условиями, щелкните кнопку Я принимаю условия лицензионного соглашения в лицензионном соглашении.
- Щелкните кнопку Далее, чтобы установить SketchUp в папке по умолчанию.
- Щелкните кнопку Установить, если настройки вас устраивают.
- Щелкните кнопку Готово в окне соответствующего запроса.
Windows 7 и Windows 8: Перед авторизацией не забудьте закрыть SketchUp Pro после его установки. - Запустите SketchUp один раз перед выходом из учетной записи администратора. Если у вас есть лицензия SketchUp Pro, вам необходимо авторизовать ее под учетной записью администратора. См. ссылки ниже для справки по авторизации.
После загрузки файла выполните следующие действия для установки SketchUp.
- Дважды щелкните установочный файл DMG. Будет смонтирован диск установки и откроется окно Finder.
- Щелкните и перетащите приложение в папку «Приложения». Вам будет предложено ввести пароль учетной записи пользователя.
Примечание.
- Лицензию на одного пользователя может использовать только зарегистрированный пользователь.
- Зарегистрированные пользователи могут авторизовать до 2 персональных компьютеров.
Поддержка драйвера видеокарты
Для обеспечения бесперебойной установки и работы SketchUp мы рекомендуем убедиться, что у вас установлен самый свежий драйвер видеокарты. Подробнее об обновлении драйвера видеокарты можно узнать в Справочном центре.
Для обеспечения бесперебойной установки и работы SketchUp мы рекомендуем установить самый свежий драйвер видеокарты. Для этого убедитесь, что у вас установлена самая последняя версия OS X или macOS. Если в настоящий момент вы используете не самую последнюю версию macOS, то мы рекомендуем обновить ее.
Примечание к разрешениям
Для успешной установки и авторизации SketchUp Pro сначала необходимо войти в Windows с правами администратора или опытного пользователя.
Для успешной установки SketchUp Pro на Mac сначала необходимо войти в Mac с правами администратора
Обратите внимание, что во время установки вам также будет предложено ввести имя пользователя и пароль
Подсказка. SketchUp 2019 не устанавливается поверх более ранних версий SketchUp. На одном и том же компьютере можно установить несколько версий SketchUp. Но если вам не нужны более ранние версии, их можно удалить, чтобы не засорять компьютер.
Пропорциональное масштабирование выборки
Если вы хотите изменить размер геометрии в модели и сохранить ее пропорции, вы можете использовать инструмент «Рулетка» или инструмент «Масштаб». Выбор зависит от того, как вы хотите установить масштаб:
- Чтобы масштабировать размер определенной линии, используйте рулетку. Например, вы обнаружите, что одна комната на плане этажа может иметь ширину не более 10 футов, но остальная часть плана этажа может оставаться такой же. Или вы знаете, что статуя должна быть 3 метра в высоту.
- Чтобы изменить размер выделенной области в процентах от исходного размера, используйте инструмент «Масштаб». Например, выберите этот метод, если вы хотите увеличить размер выборки на 200% или уменьшить его до 50%.
Чтобы масштабировать часть вашей модели с помощью рулетки, выполните следующие действия:
- С помощью инструмента Выбрать () выберите объекты, которые нужно масштабировать.
- Щелкните выборку и в появившемся контекстном меню выберите Создать группу.
- Дважды щелкните группу. Вокруг группы появится рамка из пунктирных линий, указывающая, что вы открыли группу, как показано на рисунке.
- Выберите инструмент Рулетка () или нажмите клавишу T.
- Щелкните одну конечную точку контрольной линии. Используйте механизм вывода SketchUp, чтобы выбрать точную конечную точку.
- Щелкните другую конечную точку контрольной линии. Текущее расстояние отображается в поле «Измерения», как показано на рисунке. В этом примере, скажем, вам нужно уменьшить эту ширину до 10 футов из-за проблем на участке, где будет построен план этажа.
- Введите новый размер линии (в этом примере вы вводите 10′) и нажмите клавишу Enter. Этот размер будет использоваться в качестве основы для пропорционального масштабирования вашей модели. SketchUp спросит, хотите ли вы изменить размер группы или компонента.
- Нажмите кнопку Да, и ваша выборка изменится пропорционально. Посмотрите результат на следующем рисунке. Это комната намного меньше.
Примечание. Этот процесс также работает с компонентами. См. Добавление готовых компонентов и динамических компонентов для ознакомления с компонентами. В разделе далее в этой статье объясняется, как масштабирование влияет только на один компонент или все экземпляры компонентов в модели.
Если вы хотите пропорционально масштабировать модель в процентах, инструмент «Масштаб» легко справится с этой задачей. Представьте, что вы не знаете, как поговорить со своим клиентом об уменьшении комнаты на его плане этажа до 10 футов шириной, поэтому вы моделируете слона в комнате, пока обдумываете это. Вот как масштабировать слона или любую другую выборку в вашей модели в процентах:
- С помощью инструмента Выбрать () выберите геометрию, которую нужно масштабировать. Этот шаг важен, если вы хотите масштабировать сложную 3D-выборку. Если у вас простая выборка, например 2D-фигура или объект поверхности, вы можете пропустить этот шаг.
- Выберите инструмент Масштаб () или нажмите клавишу S. Вокруг вашего выбора появится желтая рамка с зелеными ручками, как показано на рисунке. Если вы пропустили шаг 1, щелкните геометрию курсором инструмента «Масштаб».
- Для равномерного масштабирования или сохранения пропорций выборки щелкните угловую ручку масштабирования. Выбранная ручка и противоположная ручка масштабирования становятся красными, как показано на следующем рисунке, а в поле «Измерения» вы видите масштаб 1.00, что означает, что ваша геометрия имеет исходный размер или масштабируется до 100%.
- Переместите курсор, чтобы масштабировать объект. В поле «Измерения» масштаб отображается динамически. Чтобы начать все заново, в любой момент нажмите клавишу Esc. Чтобы установить масштаб из центра, а не из противоположного угла, удерживайте клавишу Ctrl (Windows) или клавишу Option (macOS), перемещая красную ручку угла.
-
Щелкните, чтобы установить новый масштаб вашей выборки. Или введите желаемые размеры шкалы и нажмите Enter.
Примечание. Технически на шаге 5 вы можете ввести размер, например 2 м или 3″, вместо размера в масштабе. Однако масштабирование на основе измерения с помощью рулетки, как правило, более интуитивно понятно.
SketchUp Plugins:
- First, click on “Extension Manager”; the red gem icon on the far right of the toolbar.
- Or, you can open “Extension Manager” from the “Window” drop menu.
- Second, click on “Install Extensions” at the bottom left of the Extension Manager Window.
- Third, choose the extension file with the ‘rbz’ extension from the download folder.
- Now, the extension will appear in your list of extensions. Make sure it is enabled.
- When you restart SketchUp, the shortcut toolbar or icon of the installed extension will appear.
Now, check out these helpful extensions.
1.Joint Push/Pull
This is a plugin that provides various options for the extrusion of surfaces, one of which is extruding multiple surfaces in parallel. You can check out the user manual provided by the developer for more details. You may need to download the Free Library extension by the same developer before that.
2.Multiple Offsets
Are you familiar with AutoCAD’s offset? That does the same job but in 3D. The extension offers offset methods. You can select one or more surfaces you would like to offset and then choose one of the three options.
3.CLF Shape Bender
This plugin lets you bend a group or a component to match the path of a curve or even a free-hand line. It gives you a wireframe preview of the product before execution.
4.RandomPushPull
You can play with this plugin to create various forms of playful wall cladding. It randomly extrudes all the selected surfaces within the range you enter. You just need to insert a minimum and a maximum value, then you will get a set of extruded surfaces with depths ranging between these two values.
5.FredoScale
This plugin provides a variety of scale transformation options to your model. These options include stretching, tapering, and twisting among others.
6.Soap Skin & Bubble
This plugin lets you apply a skin over the space between specified edges, and play with it to create a complicated yet smooth surface. However, this plugin is only free until April 2018.
7.Curviloft
This is another interesting plugin by Fredo6 that gives a parametric edge to the simple modeling software. It produces 9 different modeling options which can be created from a set of selected curved lines.
8.Selection Toys
This plugin gives you a variety of selection options, similar to QSelect or Filter in AutoCAD. That way you can avoid changing or deleting the wrong entity.
9.Weld
Like the Weld option in 3Ds Max, this plugin makes it possible to turn a set of connected lines and arcs into a single polyline.
10.Fredo6: Bezier Spline
This extension gives you a wider variety of line drawing options which include Polylines, Bezier, and Spline curves. These baselines can be useful to create unique forms.
12.LSS Matrix
This plugin performs the job of the Array command in AutoCAD. It creates 3D rectilinear or radial patterns from selected components. It can be used for example, to model spiral stairs. All you need to do is the model of the first two steps.
13.QuadFace Tools
This plugin facilitates dealing with non-planar surfaces. It can be handy with form-based conceptual models, topographies, or furniture design.
14.Sketchy FFD
This plugin surrounds your model with a box of control points that let you modify and manipulate the mesh which is composing the model.
16.SectionCutFace
Do you know how to use the Section Plane option in the Tools drop-down menu in SketchUp? This plugin will complement this useful tool by giving a finishing face to hollow cut surfaces. This way you can present your 3D or even 2D sections without further editing.
18.CleanUp³
This extension literally cleans up your model, for example, it removes the hidden and duplicated lines, deletes lonely edges, and merges surfaces on the same plane.
19.Purge All
This plugin, also, rids your model of all the unused components, layers, and materials or whatever you choose it to remove. It, also, shows an optional report, listing the removed items.
20.Fredo Tools
This extension by Fredo6 gives a variety of handy options of no specific category. It groups a set of standalone plugins.
21.Simplify Contours Tool
This extension simplifies contour lines by reducing the number of edge segments forming them, and so the file size is notably reduced.
22.Edge Tools²
This extension is also useful for plans and maps imported from AutoCAD. It, reasonably, reduces the number of segments, closes small gaps, and detects open ends.
23.Architect Tools
This plugin can be helpful with advanced or urban scale uses. It creates buildings, merges them, and deals with contours and terrains, imported from 2D CAD files.
Finally, make sure to check out the guidelines and manuals by the developers to understand the full potential of these SketchUp plugins, and good luck with your modeling!
Uninstalling or removing extensions
If you need to uninstall one or more extensions, the Extension Warehouse makes this task quick and easy:
- In SketchUp, select Extensions > Extension Warehouse and sign in to the Extension Warehouse.
- Select My Extensions from the user menu. The Extension Warehouse opens to the My Extensions tab.
-
You can uninstall all your extensions in one move by clicking Uninstall All in the top right of the My Extensions tab. Or, you might uninstall a single extension that you no longer use by clicking its Uninstall option.
Tip: When you uninstall an extension, it’s grayed out and moves to the bottom of the My Extensions tab, like the 3D Text Editor extension shown in the earlier figure. If you change your mind later, click Install to reinstall the extension. Or if you’re completely and totally done with the extension, click Remove to delete the extension from your My Extensions tab.
To uninstall an extension in the Extension Manager, follow these steps:
- Select Extensions > Extension Manager. The Extension Manager window appears.
- Click the Manage tab at the top.
- On the Home tab, click the Uninstall button next to the extension that you want to uninstall. After a few moments, your extension is removed from your copy of SketchUp. If you ever want to reinstall the extension, you can quickly access the extension on your My Extensions page in the Extension Warehouse.
Setting preferences to customize your workspace
In SketchUp, preferences options enable you to customize your workspace.
To access these preferences, select Window > Preferences (Microsoft Windows) or SketchUp > Preferences (Mac OS X) from the menu bar. In the sidebar on the left, select the preference panel that you need.
The following table outlines how you can customize the workspace and what preference panel enables you to make a change.
Tip: SketchUp extensions, also called plug-ins, enable you to add specialized tools and features to SketchUp. To customize your workspace with extensions or manage you extensions preferences, log into the Extension Warehouse and use the extensions management features. See the Extension Warehouse section of the Help Center for details.
| To Do This | Open this Preference Panel | Good to Know |
|---|---|---|
| Set the default image editor. | Applications | Determines what image editor opens when you want to edit a texture in an external editor. Click Choose and select an application on your operating system. |
| Display crosshairs on your cursor that correspond to axes colors. | Drawing | Select the Display Crosshairs checkbox in the Miscellaneous area. |
| Activate the Paint Bucket tool after you click a material swatch (Mac OS X only). | Drawing | This checkbox is enabled by default. Deselect Auto-activate Paint Tool to disable it. |
| Toggle the Push/Pull tool’s pre-pick feature. | Drawing | Pre-pick is enabled by default so that you can select a face, orbit, and push/pull the face even when the selected face doesn’t appear in the current view. Select Disable Pre-pick on Push/Pull Tool to disable the feature. |
| Display a component bounding box and its edges in different colors. | Compatibility | This feature is disabled by default. Select the Bounding Box Only checkbox, and a component’s edges appear in a different color from the component box when you select the component. |
| Change the size of the toolbar buttons. | Workspace | The large buttons are enabled by default because they’re easier to see and use. For smaller buttons and a larger drawing area, deselect the Use Large Tool Buttons checkbox. |
| Select whether windows cascade and the default window size (Mac OS X only). | Workspace | On a Mac, windows cascade by default. Deselect Cascade Main Windows to turn off cascading. Click the Save Current Window Size button to make the size of the active window your default window size in SketchUp. |
| See the toolbars and panel trays after closing them. | Workspace | Click the Reset Workspace button and your toolbars and panels instantly reappear in the most recent docked position . |